Tuesday 4 December 2018

House Out The Window


Beginning of embroidery house out the window
Pencil Sketch of the house to be embroidered
Summer got very busy this year building gardens and getting set up in my new location. I have some time to get back to work now and would like to start by getting this one finished. I'm done more than I'll show you today but I have taken pictures all the way along so there will be more to come later.

I started this piece in the spring inspired by the view from my window challenge put on by the San Francisco School of Needlework At first I didn't even really think I had much of a view out my window just some walls and fences. When I took a closer look at what was over the fence I could see an old style house back under the trees with old tools lined up along the edge of it. With a little less fence and some more of the trees and sky it did make a nice subject for a landscape scene.

I took a bunch of pictures first then made a sketch based on the pictures. I scanned the sketch onto the computer to crop and size. Then darkened all the lines for a print out that could be traced on a light board. I have had better success this way. I've tried tracing pictures off the computer monitor but ran into a few problems with the work sliding around too much.  A tablet makes it much easier than a laptop or desktop computer. The work can be held around the back with masking tape and it can be moved around to a better position for drawing. I've found it useful sometimes for small simple designs that can be traced quickly. Designs that take longer to copy can get in the way of using the computer for anything else until the tracing is done. Depending how long it takes this can get very annoying.

Selection of colors to be used in the embroidery

I selected a range of colors for the picture. I will not be using all of these. I wanted to narrow my choices and still have extra colors to choose from. Some may look a bit different when I try them in the embroidery. 


I started with the black lines first using a split stitch. Many of the lines went almost straight across the piece making good base lines to work from and outlining some large areas making them easy to fill in. I am not going to outline the whole picture in black it would get messy once I got to the trees. The black lines are spaces between the boards that appear black in the picture.

I moved on to adding color with an outline around the brown fence. This outlined will make the top and sides of the boards stand out when the fence is filled in.

Monday 12 March 2018

Poppy Biscornu Assembly


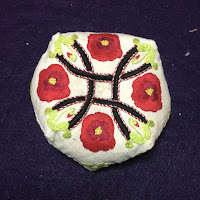
Embroidered Poppy BiscornuPoppy Biscornu with Pins

I've got pictures of the finished embroidering and assembling of the biscornu. Sewing the biscornu together went so fast it was amazing.
Poppy Bud Close UpPoppy Outlined
Poppy flower close upI finished embroidering the poppy buds first. I used stem stitch for the flower stalk. The green on the bud is back stitch for the outline. The red tip has a fly stitch for the outline and are filled with a couple satin stitches. The large poppies I outlined with a couched thread. I find it faster to make curved lines this way as there are fewer small stitches. The center is a circle of french knots with green satin stitches filling in the middle. The flower is finished by filling in the petals with satin stitch.
I decided in the end not to embroider the circle around the edge. I'm glad I did because it was so close to the edge. It would have looked distorted when I sewed it together. Below is the finished embroidery on the front and the back.
Biscornu Front SideBiscornu Back Side

To assemble the biscornu fold the seam allowance under and pin all the way around. Line the pieces up so the edges are in the middle. Sew the two pieces together half way across. Fold the fabric around the corner and keep working around this way. Stop at the last side and fill with the stuffing.

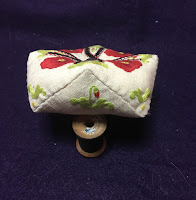
Use a dense filling and stuff it in tight making sure that it gets into the corners. Finish off the seam around. Then sew a button on the front through one on the back to hold the whole thing together. I included a picture of it propped up to show how the design looks on the side.
Biscornu Sewn TogetherBiscornu Side View

Wednesday 28 February 2018

Poppy Biscornu

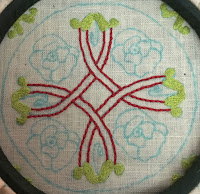
Celtic Knot and Leaves
A biscornu is a pin cushion made of two squares of fabric. The squares are offset and when sewn together make a hexagon shape. I will give the instructions on how to sew it together in the next post along with pictures of the finished embroideries. The square is 4 inches. I am about half way done the embroidery on the topside. The bottom will have minimal amount of embroidery with just a small poppy on each corner.
Poppy LeavesClose up Poppy Leaf
The pair of leaves in each corner is accented by a small yellow circle beneath. The leaves are done in long and short stitch and the circle is done in satin stitch. 

Back Stitch OutlineWhipped Back Stitch Outline

The outline of the Celtic Knot is done in whipped back stitch. I did the back stitch first trying to keep the stitches the same size so the twists would be the same distance apart. The longer the back stitches the farther apart the twists will be.
Filling Chain StitchedFilling Padded Satin Stitch

The filling is first stitched over in chain stitch. I used several strands of thread to make the stitches thick so they would stand up above the outline. I worked the Satin stitch from one side to the other giving the filling a rounded look. All I have left now is the flowers and the assembly. I hope to have the finished project posted soon.

Saturday 10 February 2018

Winter Vegetables


Here are some vegetables that are more readily available in the winter time. A yellow onion and a bunch of watercress. The onion is done in long and short stitch with outline stitch and stem stitch. The watercress is done in stem stitch and broad stem stitch with couching and satin stitch in the leaves.


I traced the onion on to the fabric. Then drew guidelines to show the direction of the stitches. I worked from the darkest part of the onion towards the lightest part. When I switched to a lighter colour I did a few rows with one strand of the lighter and one strand of the darker colour mixed together.

The outline and the detail of the onion are done in outline stitch. The roots at the bottom are done in stem stitch. The long and short stitch covered the guidelines for the detail of the onion so I worked by following the pattern.


The tie on the bunch was worked first since I wanted it to look like it was in front of the stalks. I used the stem stitch done with two strands of wool. The stalks were worked in broad stem stitch. I filled in the stalks that looked like they would be in the front first and went along filling in every second stalk. Then filling the spaces up with the remaining stalks.  
As I switched to the darker green I started working the ones in the front first again. As I climbed up the stalks I couched the outline of  the smaller leaves. This way I had an edge to end the stems going behind the leaves.   


The small leaves are filled in with satin stitches. The larger leaves are couched around the same as the small leaves. The satin stitches go halfway across leaf and meet in the middle. The join is covered later with straight stitches showing the veins in the leaf.

Sunday 28 January 2018

Needle Lace Button Loops


Decorative Buttonhole Loops
Buttonhole loop two coloursAfter making the needle roll I wanted to experiment with making some more button loops. To see if I could come up with some that were more interesting than the one used on the last piece. Some of them turned out better than others. The white loop with the blue bullion picots was the one that worked out best of all.
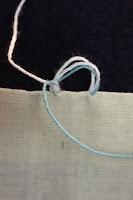
They are made in the same way as making a needle lace bar covered with buttonhole stitch and picots along it. First make three loops in the edge of the material. Start to cover the bar in buttonhole stitch. After about 5 stitches make the picot. These pictures show the start of the loop and the bullion picot. Wrap the thread around the needle and pull it through making a rounded knot.
Making the PicotMaking the rounded barCovering the bar with buttonhole stitch

Using the second threadTo make the loop two colours I used a second needle and thread. Then ran the blue thread along the bar underneath the buttonhole stitches. When I came to the place to make the picot. I slid the blue thread through the last buttonhole stitch and made the bullion knot. With the white thread behind the knot I continued along with the buttonhole stitches.
If the number of wraps on the bullion knot is increased the picot will be larger. The more buttonholes between the picots the farther apart they will be.
I used a quilting ruler to measure and mark out the loops. To make sure they were all the same size and distance apart. 
Gauge distance between buttons
The buttonhole picot is made by forming a little loop. The larger the loop the longer the picot will be.  Work a row of buttonhole stitches up to the top of the loop. At the top slide the needle back through the blanket stitches to hold them in place. Repeat for each picot.


The woven picot is started by making a loop like the buttonhole. Hold the loop in place with the second needle. Bring the thread back up to the top of the loop so there is a thread in the middle. Weave back and forth between the three threads till the bottom of the loop.