Wednesday 20 December 2017

Goldwork Ornament

Goldwork Christmas Ornament
 Just one last ornament for this year. It's definitely my favourite one I made this season. I wanted to try making a piece with metallic threads. It is common to use velvet as a background and I haven't tried embroidery on velvet before but I had a nice sized piece of it. I started planning a much larger piece. Then wanted to try something smaller first to see how it worked out. I started with an old medieval design.
Drawing

I used illustrator to copy the design. I found that once I made the lines wide enough I could see the design through the lightboard. The water soluble fabric pen was easy to draw with and showed up on the velvet. I had to simplified it some and changed it a little more as I went along so it would work better with the metallic threads. 

Center Wheel
Couching Threads


  I used a yellow cotton thread to couch down the metallic thread. I followed around the outlines first. I made a wheel for the circle in the center. Above the center I made three lines instead of following the outline. When I got to the flowers I decided to change to take out all the rest of the circles to simplify the design even more. Instead I looped the thread around so they crossed over in the middle. This still gave a solid look to the  center and I could use a continuous piece of thread to make the flower. 
Assembling Ornament
To assemble the ornament I trimmed the edges of the embroidery into an oval. I cut out an oval cardboard for the center and felt oval for the back. I laced the velvet over the piece of cardboard to snug it up tight. I sewed a metallic thread through the center of the top to hang it from. Then I backed the piece by sewing on the felt oval.
Felt Backing
Lacing

Wednesday 6 December 2017

Wool Blanket

I tried to find a nice warm wool blanket this winter. The prices I found were far more than I could afford. I came a crossed a large piece of thick wool fabric. It was a pink gingham pattern that already almost looked like a blanket. It was large and heavy enough to be a blanket but had raw edges at both ends. I decided to finish it off into a blanket and decorate it. This worked out much better. I got a very nice blanket now that is new and personalized. The stitches are all large and pretty simple so it was surprisingly quick for such a large piece.

The left picture shows how I finished the top edge of the blanket. I used a 1/2 inch blanket stitch along the top to cover the folded edge. Also showing where I hid the thread ends from the top inside the hem. The right picture shows where I hid the thread ends in the side of the blanket. The material was thick enough I could bury the thread inside the edge. Securing it more as I stitched over top of it. I used a smaller 1/4 inch blanket stitch along the side edges to cover the selvage and stop the material from stretching out of shape.

For the first row along the top I used a crown stitch. The crown stitch is done by making three straight stitches. The one in the middle is long and straight the two on the sides are at an angle and go in through the same hole as the first stitch. A fly stitch is made at the top passing under all three stitches.
For the next two rows I used a knot stitch or four legged knot stitch. Then a second row of crown stitches. The knot stitch looks like an upright cross stitch with a little knot in the center of it. Start with a straight stitch just like starting an upright cross stitch. Come through again on the right side slide under the upright stitch. Wrap the thread around to make a loop and pass through the loop. Go back through the fabric to the left finishing the stitch. Someday I may add more embroidery later. The more stitches the thicker and warmer the blanket will be.

Tuesday 21 November 2017

Chicken Scratch Curtains


Chicken Scratch Curtains
Chicken Scratch is a type of Cross Stitch that is worked on Gingham Fabric. It is also called Depression Lace, Snowflake Embroidery and Gingham Embroidery. I discovered this type of embroidery a few months ago. I thought that it would work well for making  set of curtains for my kitchen. This type of embroidery is quick to work and I wanted to get them done in a hurry. The main stitches used are the Double Cross Stitch, Running Stitch and the Woven Circle Stitch. This makes it a great type of embroidery for beginners since the stitches are large and there is a grid on the fabric to follow.

Chicken Scratch Snowflake GreenChicken Scratch Snowflake Blue
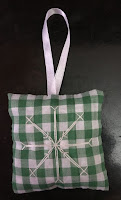
Chicken Scratch Lace Christmas OrnamentChicken Scratch Christmas OrnamentI found a set of patterns online for Chicken Scratch snowflakes. They were small and  I thought they would be quick and good to practice on. I wanted to practice on a few smaller pieces before making a design large enough for the curtains. So I made a few of them for Christmas ornaments.

Border FinishedBorder Orange Stitches
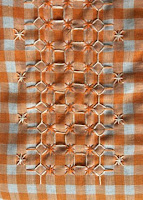
The pattern for the border I found online as well and adapted it to fit into the space available on the curtains. All the Double Cross Stitches must be worked first. Next the Running Stitches and any of the other stitches that are going to be used to anchor the woven stitches. On the left is a picture of just the orange stitches. On the right is the finished border with the whites stitches and all the woven stitches. It was essential with the fine fabric to weave the stitches through with the eye of the needle. It made them so much faster too. It is important to leave the woven stitches a little loose so they won't pucker up the fabric.


This is a close up of an end of the rectangle in the middle. If I were going to change anything about the design I would use a cross shape in the center rather than an x. So the stitches would show up better being on darker squares with no white on white stitches. In the end there will be two curtains. I am going to make a second curtain then later I will put up a picture of the two finished curtains.

Tuesday 31 October 2017

Fall Vegetables


I had to take some time off to pack all my stuff up and move over the summer and fall. Now falls pretty much over and I am getting settled again. I am finished the last sampler for the course. I used summer and fall squashes for the motifs on the sampler. I used the same stitches for both of them. Long and Short Stitch for the body with Double Knot Stitch and Bullion Stitch for the stems.
I think the Zucchini with the straight lines turned out better. I started out with very simple shapes and drew guidelines to mark the stitching. On the Zucchini I only used them to mark the rows on the Spaghetti Squash I used them to mark the rows and the direction on the stitches.    


I worked lengthwise along the Zucchini. I tried to get a rounded look by shading the threads so they were dark at each side and lighter towards the middle.

The Spaghetti Squash I worked from side to side. I tried to round the rows so that it looked more circular. It was difficult to start with the circle of Long and Short Stitch at the bottom.

The stem is the part of the squashes that turned out the best. It is my favourite part. I used three rows of Double Knot Stitch and a Row of bullion knots in between. The Knot Stitches gave them a bumpy look. The left picture on the bottom shows the rows of Double Knot Stitch and the picture on the right shows the rows of finished Stem with the rows of Bullion Knots.

I am hoping to get more embroidery done now that the cool weather is here.

Tuesday 11 July 2017

Summer Shorts

Embroidered Shorts
I wanted to get some shorts fixed up for summer. I picked these because they looked a little plain when I got them and were missing the string in the center. I found a bright blue string for them and designed a small motif to make for top left corner. I wanted something that looked lacy and matched the string.

Hand drawn shorts with both corner motifsI drew a few different designs and decided on a swirly pattern with small flowers between them. I made a copy of that and flipped it around to place in the bottom right corner to add some more decoration to the bottom of the shorts.
Coloured MotifCopying Motif
Stem Stitch swirlsI coloured in the drawing and made the center of the flowers to match the  blue string. I copied the design again and cut off the edges right up to the swirls. It can be hard to copy designs onto denim because it is so thick and dark. I used a black fine line marker which is a little risky cause any errors have to be covered. I drew around the edges and then redrew the rest on the shorts using the edges for guidelines.

I started by working the lines of the swirls with a stem stitch to make them look more rounded and curly.
Split Stitch OutlineSatin Stitch flowers
I made the center of the flowers with Satin Stitch. Each of the flower petals was outlined in Split Stitch then Satin Stitched over top. The split stitch outline raises the Satin Stitches and helps define the edge.
Finished MotifThe picots were added last each one is an Open Chain Stitch which easily followed the swirly lines. The Stem Stitch swirls and the flowers were done right away. The picots took a little longer than I would have liked. Overall the embroidery made the shorts a lot more interesting to look at and gave them a more delicate look. 


Saturday 24 June 2017

Finished Sampler

We are into summer now and the planting season is pretty much over. I have the planting sampler finished for now.

The wheel of the wheelbarrow was done in chain stitch. The inside of the wheel was a buttonhole stitch wheel to make them look like spokes inside.  The rest of the wheelbarrow is worked in outline stitch and stem stitch.

The pea is done with the same stitches that I used in the crewel embroidery piece. It was adjusted a bit to make it a little smaller.


I think that the spinach was my favourite of the seed packages in the end. The leaves were done in outline stitch and the veins in the leaves were done in stem stitch.


The piece on the left is the final Jacobean style piece for lesson two of the crewel embroidery course. I was going to post it before but after I mailed it off. I deleted the picture off of my camera. Then had to wait till it got mailed back before I could take another picture.

The large white flower petals are done in Cretan Stitch and then are outlined in a double running stitch. The red and yellow patch at the center of the flower is also Cretan stitch and so is the dark section on the large leaves at the bottom. The green leaves above the flower are worked in a striped buttonhole stitch. The smaller dark green leaf is buttonhole stitch as well. The stem was done in a twisted chain stitch. The tendrils were worked in the coral knot. Double running stitch is also used for the orange striped section of the flower. The fly stitch was used for the center light green in the large leaves and for the yellow and orange v's in the flower. Below the v's is a row of magic chain stitch in red and white. The three scalloped rows below that are done in buttonhole stitch.  

Tuesday 16 May 2017

Crewelwork Dragonfly and Butterfly

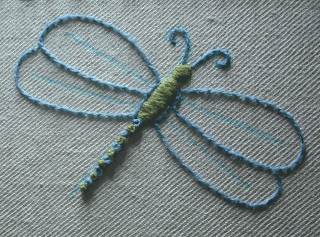
Embroidered Dragonfly
With summer coming soon the insects are flying by again. Many of the bugs are very beautiful when looked at closely. They are a popular subject in embroidery. Many books have been written just about designs and techniques used to recreate the look of these fascinating creatures. Quite a few artists worked almost solely on this subject.
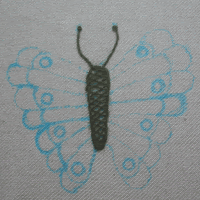
Embroidered Butterfly

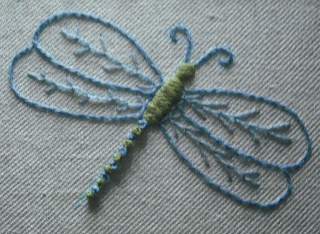
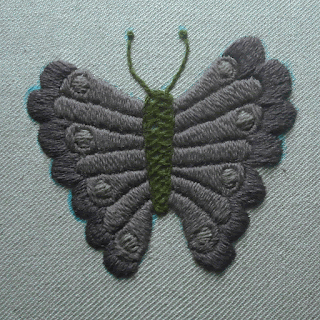
The Dragonfly is made with Appleton's Crewel wool light Olive Green and two shades of Marine Blue. The body and the antenna of the butterfly are a Dark Olive green. The wings are two shades of Mauve and a Dull rose pink for the spots. I used these pieces as the motifs for the sampler in the third lesson of the Crewel Embroidery Course.

The body of the butterfly is worked first in herringbone stitch then surrounded in outline stitch. Then the antenna were added in split stitch with a french knot on each end.

Butterfly Wings Split StitchButterfly Body Herringbone Stitch
Butterfly wingtips Satin Stitch
For the wings on the butterfly I split stitched around each segment. Then satin stitched over top. The spots where worked first so that I could keep a more uniform shape when I stitched around them. The light Mauve is workup up and down and the darker wing tips are worked side to side.

Dragonfly Body Satin StitchThe body of the Dragonfly is made the same as the wing segments in the butterfly.
By split stitching around and doing the satin stitch over top.

Dragonfly Wings Split StitchDragonfly tail French KnotThe tail is a row of French Knots made with two strands of wool to make the knots larger. The antenna and the outline of the wings are made in split stitch. The veins of the wings are worked in Feather Stitch. Starting from just inside the outer edge of the wing towards the body.