Sunday 28 January 2018

Needle Lace Button Loops


Decorative Buttonhole Loops
Buttonhole loop two coloursAfter making the needle roll I wanted to experiment with making some more button loops. To see if I could come up with some that were more interesting than the one used on the last piece. Some of them turned out better than others. The white loop with the blue bullion picots was the one that worked out best of all.
They are made in the same way as making a needle lace bar covered with buttonhole stitch and picots along it. First make three loops in the edge of the material. Start to cover the bar in buttonhole stitch. After about 5 stitches make the picot. These pictures show the start of the loop and the bullion picot. Wrap the thread around the needle and pull it through making a rounded knot.
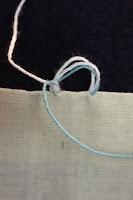
Making the PicotMaking the rounded barCovering the bar with buttonhole stitch

Using the second threadTo make the loop two colours I used a second needle and thread. Then ran the blue thread along the bar underneath the buttonhole stitches. When I came to the place to make the picot. I slid the blue thread through the last buttonhole stitch and made the bullion knot. With the white thread behind the knot I continued along with the buttonhole stitches.
If the number of wraps on the bullion knot is increased the picot will be larger. The more buttonholes between the picots the farther apart they will be.
I used a quilting ruler to measure and mark out the loops. To make sure they were all the same size and distance apart. 
Gauge distance between buttons
The buttonhole picot is made by forming a little loop. The larger the loop the longer the picot will be.  Work a row of buttonhole stitches up to the top of the loop. At the top slide the needle back through the blanket stitches to hold them in place. Repeat for each picot.


The woven picot is started by making a loop like the buttonhole. Hold the loop in place with the second needle. Bring the thread back up to the top of the loop so there is a thread in the middle. Weave back and forth between the three threads till the bottom of the loop.

Tuesday 23 January 2018

Floral Needle Roll Part 2

Embroidered Floral Needle Roll
Needle Roll Rolled Up
I got the needle roll done and ready to use. I've been creating it my head for quite a while. I am glad that it turned out much like I imagined it would. I used very simple stitches as there is no room in here for complex stitch work. The finished piece is 3 inches high and 9 inches long. It rolls up to about 4 inches around. The needles didn't really take up any room. So it could have been rolled up smaller if I'd just made the strap a little shorter.
Embroidered Lupine
Embroidered BerriesI kept working from left to right as I was before and did the Lupine next. The stem is done in stem stitch. The leaves were done in split stitch this time. They were too large to use a detached chain stitch and I wanted a smoother look than the back stitch. The flower is made of detached chain stitches worked from the bottom towards the top.

The berries were next in line. They really stand out for being so small. The stems are done in back stitch with french knots at the end for the berries. Padded satin stitch is used for the leaves.


Allium Flower Stem Stitch Leaves
Allium flower Split Stitch leavesI did the Allium flower twice. The first time I made it with three leaves and used a split stitch filling for the leaves. The leaves looked to wide and textured and took up more space than I intended them too. I changed the Allium flower later to have just two leaves. Then used a broad stem stitch which made them look smooth and rounded at the edges.
Embroidered Blue and Yellow Flowers
Embroidered Thyme FlowersThe next three flowers in line where all small. For all three stems I used the back stitch. Both the Borage and the Thyme have detached chain Stitch and for the leaves as well as the flowers. The yellow flower is made up of a button hole scallop for the flower. I used back stitch here for the leaves so that I could get more curve than the chain stitch.
Embroidered Echinacea Flower
Last was the Echinacea flower. It's the largest of all the flowers and I could use the most detail here. The leaves are done with a padded satin stitch then a feather stitch down the center for the veins of the leaf. The flower petals are padded satin stitch. It seemed impossible to keep the lines straight while making such small stitches. The center of the flower is done in french knot stitch.
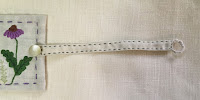
Finished Strap with Button
Decorative Button LoopThe assembly was fairly simple. I made the strap and sewed it on first. Then sewed the button over the end of the strap. I made a decorative buttonhole loop to attach the strap. The felt was centered on the inside and attached as I folded over and sewed the edges. At the end I put a line of running stitch around the edge of the embroidery. 
Finished Roll Inside

Thursday 11 January 2018

Floral Needleroll


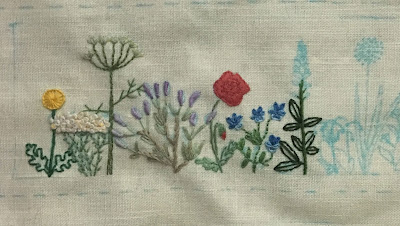
I am making a needle roll to replace my old needle book. This is the first half of the flower picture I am embroidering on the front. It took me a bit of time to make the design and I am taking lots of notes to remember how I made it later on. So I will post the first half now and have it finished to post in the next blog. I drew each flower separately scanned them onto the computer and then redrew them in Illustrator. This way I could reposition the flowers until I got them all to fit.

I did the alyssum first since it is in front of the dandelion and the dill. For the flower I filled the area with white french knots. Then added a second yellow french knot in the middle of each one. The stem is done in a back stitch and the leaves are straight stitches.


I did the Dandelion next. The flower is a buttonhole wheel. I made the stitches very close together to look like the skinny petals. The stalk is done in stem stitch and the leaves are done in back stitch. 

The flowers of the sage plant are done in bullion stitch with a variegated purple thread. The thick part of the stem is stem stitch. The leaves are detached chain stitches.


The Dill is done almost entirely in back stitch the stem, the leaves and the bottom of the flowers. The top of the flowers are done in fly stitch. Each branch of the fly stitches is topped with a small yellow straight stitch.

The Poppy flower has a couched outline for the petals. The petals are filled in with satin stitch. The stalk is a stem stitch and the leaves are detached chain stitches. The flower bud is made of three fly stitches with a few straight stitches to fill in. 


The Viola flowers are done with a blue variegated thread. They are made of four detached chain stitches at the top. With an open chain stitch for the large petal at the bottom. The leaves here are also detached chain stitches and the stems are back stitched.