 |
| Embroidered Frog |
I made this frog to add to the sampler for the Crewel Embroidery Course I am taking. Later I am going to explain the techniques used to lay out the stitches to build the frog.
 |
| Sampler |
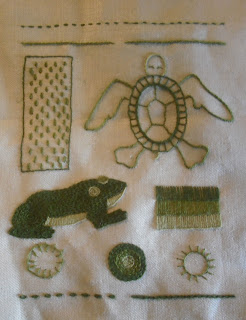
Here is a finished picture of the sampler with the two completed animal motifs. I explained how to make the turtle in a previous article. I added a rectangle at the top with an open filling. This is done in the Link Powdering Stitch which is made of Detached Chain Stitches placed at regular intervals. The rectangle at the bottom is done in solid Buttonhole Stitch. Each row done in a lighter colour for shading. For the row of circles at the bottom I made the middle a solid filling of Chain Stitches. The two on either side are Buttonhole wheels. One of the wheels has the stitches facing the inside and the other has the stitches facing the outside.
 |
| Frog Accents |
 |
| Frog Stitching Body |
I embroidered the light accents on the frog first. The belly is worked in a solid Buttonhole Stitch. The stitches follow along the curved edge and are shortened as the space narrows. The circle is in Stem Stitch which spirals around from the outside toward the center. The eyelid is a Buttonhole Scallop with a row of Stem Stitch that curves around the bottom of the eye to take a more circular shape.
 |
| Frog Rear Stitching |
The rest of the frog is filled in with Chain Stitch. I worked in four separate sections first filling in the body. Then the front foot, the back leg and last the back foot. By looking at the stitches on the rear side it is easier to see the paths that the stitches follow. The sections are worked from the outside to the center same as the circle on the sampler. Each row of stitches is finished off after working all the way around the shape. Then a separate row of chain stitch is started beside it rather than spiralling around. I found this filled the irregular shapes in the frog better with out pulling the stitches into an oval shape.
No comments:
Post a Comment